General Information
Solid State Drives (SSDs) are quickly replacing traditional, mechanical, hard disk drives due to their higher speed, lower power consumption, lighter weight, and being more shock proof. However, traditional whole disk erasing utilities like Darik's Boot and Nuke (DBAN) do not work well with SSDs because the placement of data blocks is not as predictable as traditional magnetic hard disk drives. Since 2001, the Secure Erase command is built into the firmware of the controller on Parallel ATA (PATA) and Serial ATA (SATA) hard drives. This includes both traditional hard disk drives and solid state drives. The Secure Erase command writes zeros to the user data portion of traditional hard drives or returns the cells to their original, factory state in solid state drives.
This article will show the user how to use the hdparm Utility to issue the Secure Erase command to an ATA interfaced hard drive.
This is ONLY applicable to HDD & SSD drives with Serial ATA (SATA) or Parallel ATA (PATA) interface with a Manufactured Date after 2001. ( information can be found on most desktops & laptops.)
SCSI and SAS drives are NOT covered in this article.
For general advice on wiping SSD drives, please see https://grok.lsu.edu/Article.aspx?articleid=20019
Important Notes!!
Make sure the drive is directly connected to the controller before continuing. Do not continue if the drive is connect to the computer via a hardware RAID controller or USB/Firewire to PATA/SATA bridges. Do not attempt the steps below via the USB interface.
The instructions in this article will destroy ALL data on the ENTIRE drive and not just a particular partition. Please make sure that ALL necessary data are backed up from ALL partitions before following the steps below. For safety, it is recommended that drives not intended to be wiped be removed from the system before starting the steps below.
DO NOT remove power or disconnect data cable before the operation is completed. Doing so may cause the drive to be in an unknown state and can possibly lead to a dead drive "bricking" or, more importantly, a data leak scenario.
The estimated completion time is dependent on the size and speed of the drive. Some fast SSDs can take as little as two minutes, while traditional hard drives take about one hour per 100GB.
This article assumes the reader has some knowledge of the Linux Operating System.
How to Issue the Secure Erase Command
1. Download and burn a Linux LiveCD that includes the hdparm utility. CentOS 6.3 LiveCD DOES contain hdparm, however the Fedora 17 LiveCD DOES NOT, so your mileage will vary.
2. Attach the drive(s) to be erased and boot the computer up from the Linux LiveCD, and get to a root shell. All commands from now on will be issued as root.
3. Find the name of the drive(s) that you want to wipe by using the fdisk command:
fdisk -l
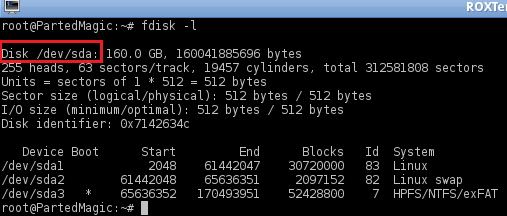
NOTE: For this example, we will be using /dev/sda.
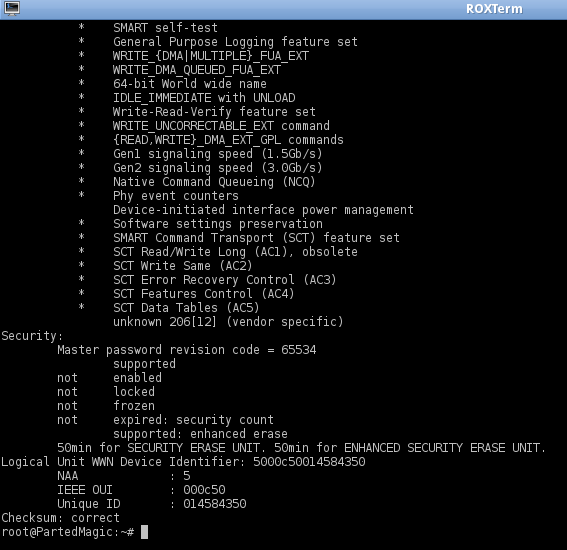
4. Check to see if the drive is frozen:
hdparm -I /dev/sda
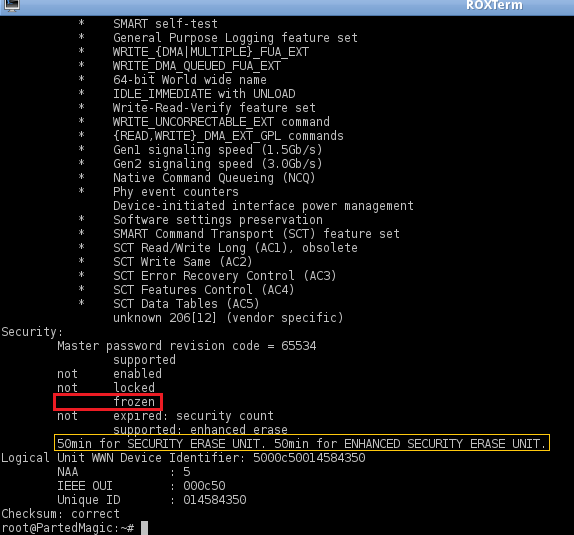
NOTE: The drive is frozen, it supports Enhanced Security Erasing, and the estimated completion time is 50 minutes.
5. Since the drive in this example is frozen, we need to unfreeze it but putting the computer to sleep with the command below. Skip this step if your drive is not frozen.
echo -n mem > /sys/power/state
6. After letting the computer sleep for a few seconds, wake it up and check to see if the drive is no longer in frozen state by issuing the command:
hdparm -I /dev/sda
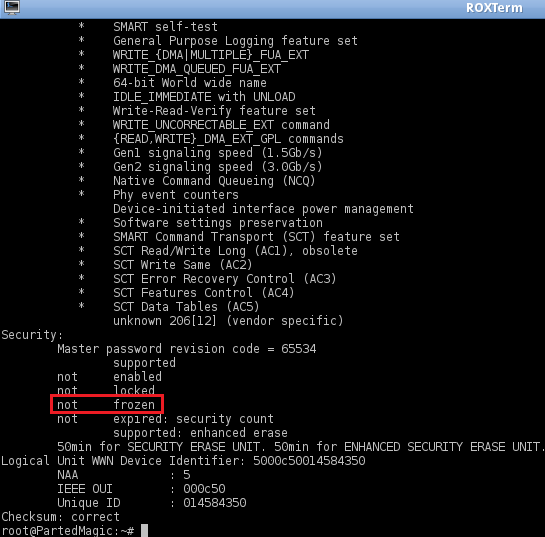
NOTE: The drive is no longer in frozen state.
7. Repeat steps 5 and 6 if the drive is still frozen. Otherwise, set a temporary password "p" in order to issue the secure erase command:
- WARNING: DO NOT leave/set password as empty, other wise this can also lead to "bricking."
hdparm --user-master u --security-set-pass p /dev/sda

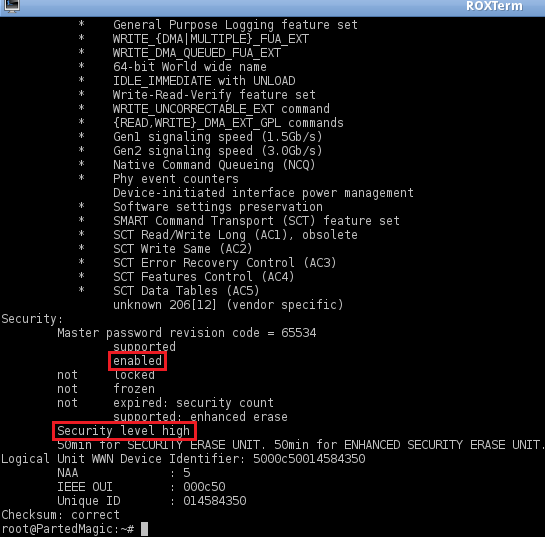
8. Check to see if the password is set correctly and that security is now enabled:
hdparm -I /dev/sda
9. Erase the drive:
If the drive DOES support Enhanced Security Erase:
hdparm --user-master u --security-erase-enhanced p /dev/sda
If NOT:
hdparm --user-master u --security-erase p /dev/sda

Warning: ALL data on the drive will be erased and will not be recoverable. Please backup all necessary data ahead of time.
10. After waiting at least the estimated amount of time as shown by hdparm output (step 4), check to see if the security erase command is finished.
hdparm -I /dev/sda
NOTE: See the differences between the picture above and the one in Step 8. The security erase command reset the password and the security level back to the default.
11. We recommend verifying that secure erase actually worked via the following command:
dd if=/dev/sda bs=1M count=5
This will allow you to read the first few MBs of the disk.
If dd outputs nothing to the screen, it's reasonably safe to assume that the disk has been wiped.
*Note: If enhanced security was chosen, there may be a randomized data output. This is normal and does not mean that the disk was not wiped. If assurance is a must, a second insecure wipe can be performed & the command repeated to produce the desired result (zeroes). If desired, dd could also be repeated in various segments and sectors to read out data & verify zeroes past the scope of the command in this article.
Referenced from: Parted Magic