Chromebook: Connecting to eduroam (Wireless)
This article has not been updated recently and may contain dated material.
** Android Device Variation Notice **
There are many different versions of Android used on mobile devices. This article will present a generic set of instructions for Android-based devices. It should be used as a guide while using your Android device. Screenshots, as well as instructions, will vary depending on device make and model. While we try to include all possible options that a user may encounter, a user may see something different than what is shown in this article. For any issues that may arise while using this article, please contact the Service Desk for further assistance.
LSU Wireless Settings
- SSID: eduroam
- EAP Method: PEAP
- Phase 2 Authentication: MSCHAPv2
- Server CA Certificate: Default
- Subject Match (if requested): lsu.edu
- Subject Alternative Name Match: Empty
- User Certificate: None Installed
- Identity: MyLSU ID @lsu.edu
- Password: MyLSU Password
- Anonymous Identity: Empty
- Domain suffix match (if requested): lsu.edu
Connect a Chromebook to eduroam Wireless
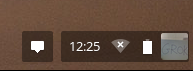
1. Click the WiFi icon at the bottom right of the screen.
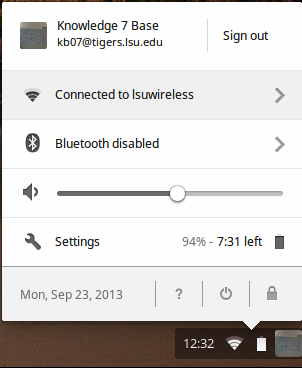
2. Click the section labeled "Connected to lsuwireless" and select eduroam from the menu.
3. Enter Wi-Fi Network Settings for eduroam:
NOTE: In some instances, you may have to change the Server CA Certificate to "Do Not Check".
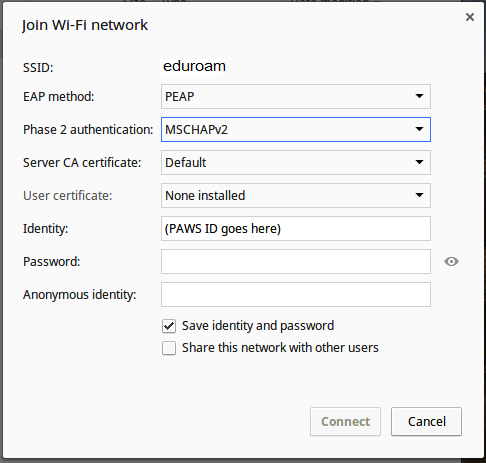
Below are the Configuration Settings for eduroam wireless:
- SSID: eduroam
- EAP Method: PEAP
- Phase 2 authentication: MSCHAPv2
- Server CA Certificate: Default
- Subject Match (if requested): lsu.edu
- Subject Alternative Name Match: Empty
- User Certificate: None Installed
- Identity: myLSU ID @lsu.edu
- Password: myLSU Password
- Anonymous Identity: Empty
- Domain suffix match (if requested): lsu.edu
NOTE: Enter your myLSU credentials in the form <myLSU ID>@lsu.edu. If you do not do this, you WILL receive an error message.
4. Click Connect.
5. If you can't connect, please delete eduroam from your known networks and then manually add it again, but change the CA Certificate to Do not check. If that does not work, switch it back to Default on the same screen and try again. The third time, try changing it back to Do not check again. If the third time does not work, please visit the Service Desk for further assistance.
Referenced from: Google
17398
4/15/2024 11:34:18 AM